torstai 2. heinäkuuta 2009

Creating a jQueryUI color chooser widget

In this short tutorial I will show you how to make a color chooser widget for your website/application using the jQueryUI library's slider and dialog controlls.

Introduction


There's a good example on how to use jQueryUI slider contolls to choose a color in the jQueryUI's webpage.
Today we'll take that one step further and create a color chooser dialog widget for use in websites.


Step 1 - Get the libraries


Start off by downloading the jQueryUI library from http://www.jqueryui.com with a theme of your choosing.
I downloaded the whole library, but not all of the components are needed for this tutorial.


Notice that the download packace includes a version of the jQuery library.


Step 2 - The page


I've made just a simple html page with two inputs to demonstrate our color chooser.


<?xml version="1.0" encoding="ISO-8859-1" ?>
<!DOCTYPE html PUBLIC "-//W3C//DTD XHTML 1.0 Transitional//EN" "http://www.w3.org/TR/xhtml1/DTD/xhtml1-transitional.dtd">
<html xmlns="http://www.w3.org/1999/xhtml">
<head>
<meta http-equiv="Content-Type" content="text/html; charset=ISO-8859-1" />
<link type="text/css" href="css/ui-darkness/jquery-ui-1.7.2.custom.css" rel="stylesheet" />
<script src="js/jquery-1.3.2.min.js" type="text/javascript"></script>
<script src="js/jquery-ui-1.7.2.custom.min.js" type="text/javascript"></script>
<script src="js/colorpicker.js" type="text/javascript"></script>
<style type="text/css">
#red, #green, #blue {
float: left;
clear: left;
width: 300px;
margin: 15px;
}
#swatch {
width: 120px;
height: 100px;
margin-top: 18px;
margin-left: 350px;
background-image: none;
}
#red .ui-slider-range { background: #ef2929; }
#red .ui-slider-handle { border-color: #ef2929; }
#green .ui-slider-range { background: #8ae234; }
#green .ui-slider-handle { border-color: #8ae234; }
#blue .ui-slider-range { background: #729fcf; }
#blue .ui-slider-handle { border-color: #729fcf; }
</style>
<title>Color picker demo</title>
</head>
<body>
<h1>Set the colors</h1>
Color #1: <input type="text" name="color_1" id="color_1" value="" /><br />
Color #2: <input type="text" name="color_2" id="color_2" value="" /><br />

<div id="colorpicker" title="Choose a color">
<div id="red"></div>
<div id="green"></div>
<div id="blue"></div>

<div id="swatch" class="ui-widget-content ui-corner-all"></div>
<input type="hidden" name="selector" id="selector" />
</div>

</body>
</html>

I've included the theme's style sheet (notice that depending on the theme you choosed the path will vary), the jQuery library, the jQueryUI library and our own java script file.


The div colorpicker will be our dialog and the div's red, green and blue will be our sliders.
The jQueryUI makes adding these components into an html page a breeze.


Step 3 - Javascript


Make a new javascript file in the js/ folder and name it colorpicker.js.


If you open the jQueryUI page and look through the demos, you'll see the color chooser demo. Let's add those functions into our js file.


function hexFromRGB (r, g, b) {
var hex = [
r.toString(16),
g.toString(16),
b.toString(16)
];
$.each(hex, function (nr, val) {
if (val.length == 1) {
hex[nr] = '0' + val;
}
});
return hex.join('').toUpperCase();
}
function refreshSwatch() {
var red = $("#red").slider("value")
,green = $("#green").slider("value")
,blue = $("#blue").slider("value")
,hex = hexFromRGB(red, green, blue);
$("#swatch").css("background-color", "#" + hex);
}
$(function() {
$("#red, #green, #blue").slider({
orientation: 'horizontal',
range: "min",
max: 255,
value: 127,
slide: refreshSwatch,
change: refreshSwatch
});
$("#red").slider("value", 255);
$("#green").slider("value", 140);
$("#blue").slider("value", 60);
});

That code will create for us the silders and handle the conversion routine between the slider values and the hex color value.


Add an automaticly runned function with the following markup.


$(function() {
});

What ever is inside this function will be executed when the file is loaded. Inside it, let's add our dialog function.


$('input').click(function() {
$('#selector').val(this.id);
$('#colorpicker').dialog('open');
});

Now when the imputs are clicked, we'll store their id into the hidden selector field to know into which input we need to return the color value.
Then we simply open the color chooser dialog. But as we have not yet created that dialog we must add also the following lines.


$("#colorpicker").dialog({
bgiframe: true,
autoOpen: false,
width: 600,
height: 350,
modal: true,
buttons: {
'Choose a color': function() {
var elem = $("#selector").val();
var color = $("#swatch").css("background-color");
$("#" + elem).val(color);
$(this).dialog('close');
},
Cancel: function() {
$(this).dialog('close');
}
},
close: function() { }
});

This instructs the jQueryUI library to create the kind of dialog we want and to add the buttons into it.
When the Choose a color button is clicked we get the color of the swatch element and return it into the input that was clicked.
Then we just close dialog and let the user continue their surfing.


Conclusions


This has been a short tutorial on how to take the jQueryUI color chooser demo one step further and turn it into a useable color chooset dialog widget.
Hope you have enjoyed reading and learnt something new. Thaks for reading!

Remember me? Using cookies to remember login longer

There's been a lot of great tutorials on login pages and allmost every aspect has been covered. This tutorial will show you how to give your user the option to stay logged in using cookies.

Introduction

I won't be going too deep into the anatomy of a login page, since there's more than enough good tutorials covering that already. Instead I'll just show you how to use cookies to remember login data.


Here's the page we'll be using. Nothing fancy this time.


Step 1 - The page


Well make just a basic html page. This tutorial is not about how to make a good login page so please don't concentrate too much on the irrelevant things.


<!DOCTYPE html PUBLIC "-//W3C//DTD XHTML 1.0 Transitional//EN" "http://www.w3.org/TR/xhtml1/DTD/xhtml1-transitional.dtd">
<html xmlns="http://www.w3.org/1999/xhtml">
<head>
<meta http-equiv="Content-Type" content="text/html; charset=ISO-8859-1" />
<link rel="stylesheet" type="text/css" href="style.css" />
<title>Remember me?</title>
</head>
<body>
<h1>Secret page</h1>
<?php echo $contens; ?>
</body>
</html>


Step 2 - The PHP


Append in the top of the page the following lines of PHP.


<?PHP
session_start();

In every login system it's necessary to call for the session start before anything else get's sent to the users browser.
The same this goves to cookies by the way.
Since they'r also sent inside the header call, it's important that nothing other that header info is sent before them.


if(isset($_GET['do']))
{
if($_GET['do'] == "logout")
{
unset($_SESSION['loggedin']);
setcookie('uvSavePass', "", time()-2592000);
}
}

Before checking the cookies, sessions, or login information, we must give the application the option to unset the logged in state.
Otherwise we'll end up doing all the login checks for nothing.


If the user has requested to be logged out, we unset the session variable and set the cookie to be valid until some time in the past.
So we are setting the same cookie, we can't directly just delete it from the users computer.
Instead we simply set it's best before date to be in the past so the users browser knows to get rid of it automatically.


if ( !isset($_SESSION['loggedin']) )
{
if ( isset( $_POST['dologin'] ))
{
$username= htmlspecialchars($_POST['username'], ENT_QUOTES);
$password = htmlspecialchars($_POST['password'], ENT_QUOTES);
$result = ($username == "joe" && $password == "123");
if ($result != false)
{
if ( $_POST['rememberme'] == "on" ){
$cookie = base64_encode(serialize(array('uname'=>$username,'password'=>$password)));
try
{
setcookie('uvSavePass', $cookie,time()+2592000);
}
catch (Exception $error)
{
$contens = "Error saving cookie: $error";
}
}
$_SESSION['loggedin'] = true;
$contens .= "<p>Welcome to the site.</p><p><a href=\"?do=logout\">Click here</a> to log out</p>";
}
else
{
$contens = "Incorrect username or password!";
$contens .= '
<form method="post" action="?do=login">
Username: <input type="text" name="username" /><br />
Password: <input type="password" name="password" /><br />
<input type="checkbox" name="rememberme" value="on" /> Remember me?<br />
<input type="submit" name="submit" value="Log in" />
<input type="hidden" name="dologin" value="true" />
</form>
';
}
}


If the session is not yet set (i.e. the user is visiting for the first time, the first time since logging out, or after such a long period that the session has expired) we'll check for two things.
First, shown here, we check if the user has submitted the login form.
If the login information is correct (change the variable comparison to use a database in your application) we set the session variable.
If the Remember me? checkbox was checked we set a cookie with base64 encoded login information and set it's lifetime to time + 1 month.
It is true that this way someone can hack the password from the cookie if one would gain access to the user's computer, but since many people save their login information into the browsers remember password functionality, this is at least no more insecure.


else if ( isset($_COOKIE['uvSavePass']))
{
$u = unserialize(base64_decode($_COOKIE['uvSavePass']));
$result = ($u['uname'] == "joe" && $u['password'] == "123");
if ($result != false)
{
$_SESSION['loggedin'] = true;
$contens .= "<p>Welcome to the site.</p><p><a href=\"?do=logout\">Click here</a> to log out</p>";
}
}

Ok, so the user hasn't posted the form.
Now we must perform the secons check to see if a cookie exists.
If it does and it's contents are correct, we set the session variable to true.


else
{
$contens .= "<p>Please log in.</p>";
$contens .= '
<form method="post" action="?do=login">
Username: <input type="text" name="username" /><br />
Password: <input type="password" name="password" /><br />
<input type="checkbox" name="rememberme" value="on" /> Remember me?<br />
<input type="submit" name="submit" value="Log in" />
<input type="hidden" name="dologin" value="true" />
</form>
';
}
}
else
{
$contens .= "<p>Welcome to the site.</p><p><a href=\"?do=logout\">Click here</a> to log out</p>";
}
?>

And if the cookie is not found we'll show the user the login form.
The final else segment is visited if the session is already set and is still valid.


I'm using the WebDeveloper toolbar for Firefox.
It shows me the cookies that were sent and their content.
If everythig was set correctly we should see something like this when choosing the Remember me? option on login.


Conclusions


This has been a small tutorial on how to implement cookies on login forms. Hope you have enjoyed ant learnt something new. Thanks for reading!

tiistai 30. kesäkuuta 2009

Using jQueryUI & Ajax to create asychrnonous applications

Asynchronous Java Script is everywhere. Google apps, Microsoft Live, Flickr! and Facebook are just a whef of the bigger sites relying on AJAX. Today we'll create our own AJAX application with the help of jQuery and PHP.

Introduction


I will show you how to create your own Web 2.0 AJAX web application with the help of jQuery and PHP.
I'll also introduce you to the very handy jQueryUI library.
What we will be creating is a book database where you can store information on all of your books and the information on who's borrowed your books.
You can easily modify this sample application into a movie collection database or pretty much anything similar.
Here's a picture of the main page. The content is loaded through AJAX and this page newer needs to be refreshed.


Here's the jQueryUI dialog for adding more books to the database.
Notice that the jQueryUI is styleable through themes.
I'm using here the UI Darkness theme.
A lot of other themes can be downloaded from the jQueryUI page and you can modify them and even create your own.


A word of a warning: the jQueryUI is not fully compatible with the Internet Explorer.
It will degrade nicely and function as it should but techniques like rounded corner don't yet work.


Here's the second dialog. If you are borrowing a book to someone, just enter here to whom you are borrowing it to and the database will remember it for you.


The jQueryUI offers quite a lot of settings for the dialogs and even those icons are included in the themes.


Step 1 - Create the database


Let's start by creating our database. I'm using a single mySql table for this application.


I'm storing the borrowing information in the status field.
If the field is empty, the application assumes that the book is in the shelf.
In the other case this is where the name of the borrower is stored.


This very simple piece of sql in what the phpMyAdmin generated for me when I added the table.


CREATE TABLE `books`.`book` (
`id` INT NOT NULL AUTO_INCREMENT PRIMARY KEY ,
`title` VARCHAR( 100 ) NOT NULL ,
`author` VARCHAR( 100 ) NOT NULL ,
`genre` VARCHAR( 100 ) NOT NULL ,
`status` VARCHAR( 100 ) NOT NULL
) ENGINE = MYISAM ;

I've set the id field to be auto incrementing primary key.
This means that whenever I add a new row to the table, it get's the next available int as id.
That will come in handy later on when we need to different the lines from one another.
We could use the title as the primary key, but that way we couldn't add more than one book with the same name.


Step 2 - Get the jQuery and jQueryUI libraries


Fire up your browser and surf to http://jqueryui.com/


Click the link Build custom download on the frontpage and you're directred to a custom build form.


You only need a whew of these components to complete this tutorial, but I suggest you download the whole packet now so you can play around with it.


On other projects it important to download only the components you really need as the whole library is very large in size and can make your application really slow to load on slower connections.


The .zip file contains a lot example code.
The index.html shows you the components and icons and the development bundle folder has example application.
They are all worth looking through but for this tutorial we'll only need the js and css folders.
Extract them into your project folder.


Notice that the jQueryUI package also contains a late version of the jQuery library.


Step 3 - The basic html page


<?xml version="1.0" encoding="ISO-8859-1" ?>
<!DOCTYPE html PUBLIC "-//W3C//DTD XHTML 1.0 Transitional//EN" "http://www.w3.org/TR/xhtml1/DTD/xhtml1-transitional.dtd">
<html xmlns="http://www.w3.org/1999/xhtml">
<head>
<meta http-equiv="Content-Type" content="text/html; charset=ISO-8859-1" />
<title>Virtual bookshelf</title>
</head>
<body>

<h1>Bookshelf</h1>

<div id="container">
<p id="top-bar"> </p>

<ul id="menu">
<li class="ui-state-default ui-corner-all" id="button-load-all">All books</li>
<li class="ui-state-default ui-corner-all" id="button-load-dystopia">Dystopias</li>
<li class="ui-state-default ui-corner-all" id="button-load-fantasy">Fantasy</li>
<li class="ui-state-default ui-corner-all" id="button-load-scifi">Science Fiction</li>
</ul>

<fieldset class="ui-corner-all">
<legend>List of books</legend>
<table id="books" class="ui-widget ui-widget-content">
<thead>
<tr class="ui-widget-header ">
<th>ID</th>
<th width="25%">Title</th>
<th>Author</th>
<th>Genre</th>
<th>Status</th>
<th>Action</th>
</tr>
</thead>
<tbody>

</tbody>
</table>
</fieldset>

<p><a href="#" id="dialog_link" class="ui-state-default ui-corner-all button"><span class="ui-icon ui-icon-newwin"></span>Add a new book</a></p>

</div>
</body>
</html>


I'm using the ISO-8859-1 charset so that I wouldn't escape the whew special characters in Finnish language, but you can change this to UTF-8 if you prefer.


I've placed all the content inside a div with the id container.
This is so that I can more easily style the whole thing with css.
The p#top-bar is also just for styling.
I've placed the filter buttons inside an unordered list and given the buttons a whew css classes.
The ui-state-default is a style defined by the jQueryUI themes.
It represents a button in its default state.
The css file also has styles for buttons under hover and onclick.
The ui-corner-all is also from jQueryUI and does exactly what the name suggests, but as it uses CSS3's corner radius, it won't do anything in browser that don't support CSS3 (that's you IE).


Here's our boring plain html page now. Let's add some style to it.


Step 4 - Adding the css


In the top of the html page add the following stylesheet links. Right above the title tag is a good place.


<link rel="stylesheet" href="style.css" type="text/css" media="all" />
<link type="text/css" href="css/ui-darkness/jquery-ui-1.7.2.custom.css" rel="stylesheet" />

I downloaded the jQueryUI with the ui-darkness theme. If you chose a different theme this folder name is going to be different.


BODY
{
background: #5f5f5f url('images/bg.jpg') repeat-x;
font-family: Verdana;
font-size: 10px;
}
h1
{
font-family: Verdana;
font-size: 48px;
color: #fff;
font-style: italic;
width: 800px;
margin: 0px auto;
}
div#container
{
width: 800px;
background-color: #ffffff;
margin: 20px auto;
border-bottom: 1px solid #222222;
}
p#top-bar
{
background-color: #000000;
border-top: 1px solid #222222;
}
ul#menu
{
list-style-type: none;
margin-bottom: 50px;
}
ul#menu li
{
float: left;
padding: 4px;
margin-left: 6px;
cursor: pointer;
}
fieldset
{
border: 1px solid #cccccc;
margin: 4px;
}
legend
{
border: 1px solid #cccccc;
background-color: #efefef;
}
a.button
{
padding: .4em 1em .4em 20px;
text-decoration: none;
position: relative;
font-size: 10px;
margin: 4px;
}
a.button span.ui-icon
{
margin: 0 5px 0 0;
position: absolute;
left: .2em;
top: 50%;
margin-top: -8px;
}
#books
{
width: 100%;
}

The bg.jpg image I'm using as the page background is just a 1 px wide gradient going from black (#000000) to gray (#5f5f5f).
The a.button and a.button span.ui-icon are important to place the icon in the right place inside the button.
Without these lines the buttons are going to look like a mess.


Ok, so now we have something like this (that is if you are using a good enought browser. These screenshots are taken from Google Chrome that does a good job with at least the rounded corners).


Step 5 - Preparing the dialogs


We're using three jQueryUI dialogs to interact with the user.
We must define these elements inside the html page to add functionality to them through the jQuery later on.


Add the following divs inside the html page right above the end of the body element (right above the </body> tag).


<div id="dialog" title="Add a new book">
<p id="validateTips">All form fields are required.</p>
<form>
<fieldset>
<label for="title">Title of the book</label><br />
<input type="text" name="title" id="title" class="text ui-widget-content ui-corner-all" /><br />
<label for="author">Author</label><br />
<input type="text" name="author" id="author" value="" class="text ui-widget-content ui-corner-all" /><br />
<label for="genre">Genre</label><br />
<select name="genre" id="genre" class="ui-widget-content ui-corner-all">
<option value="Dystopia">Dystopia</option>
<option value="Fantasy">Fantasy</option>
<option value="Science Fiction">Science Fiction</option>
</select>
</fieldset>
</form>
</div>

Here's the html code for the Add a book dialog.
I've wrapped all the inputs inside an empty form just to make it more standards compliant, but this isn't really necessary.
The validateTips is identified to allow the jQuery code to display validation info to the user.
I've only added a whew fields for this tutorial.
Feel free to add to or edit these fields as needed.


<div id="dialog-borrow" title="Borrow a book">
<form>
<fieldset>
<input type="hidden" name="bookid" id="bookid" value="" />
<label for="name">Name of the borrower</label><br />
<input type="text" name="name" id="name" class="text ui-widget-content ui-corner-all" />
</fieldset>
</form>
</div>

Here's dialog number two. All it takes is a hidden field to keep track on whick book the action is targeted and an input field for the name of the borrower.


<div id="dialog-del" title="Really delete the book?">
<form>
<input type="hidden" name="bookid" id="bookid2" value="" />
<p><span class="ui-icon ui-icon-alert" style="float:left; margin:0 7px 20px 0;"></span>Are you sure you want to delete this book?</p>
</form>
</div>

And finally the confirm delete dialog.
Again a hidden input to keep track of the targeted book.
The buttons for these dialogs are added in the jQuery part.


Now we must include jQuery, jQueryUI and our soon to be made java script controller file to the html page.
Add these lines to the head of the page right under the stylesheets.


<script type="text/javascript" src="js/jquery-1.3.2.min.js"></script>
<script type="text/javascript" src="js/jquery-ui-1.7.2.custom.min.js"></script>
<script type="text/javascript" src="js/bookshelf.js"></script>


Step 7 - Create the java script controller


In the js/ folder add a new javascrpit file and name it bookshelf.js.
In this file we will create the functionality of our application.


We want the functionality to be added when the page get's loaded so lets add a new jQuery function that will get fired on DOM load.


$(function() {
});

Inside this function we must now add the code for creating and opening the dialogs and controlling the visual elements such as the button being hovered on or clicked.


$.get("load.php?action=all", function(data){
$('#books tbody').append(data);
UpdateLinks();
});

var title = $("#title"),
author = $("#author"),
genre = $("#genre"),
allFields = $([]).add(title).add(author).add(genre),
tips = $("#validateTips"),
name = $("#name"),
bookid = $("#bookid"),
bookid2 = $("#bookid2"),
loadDystopias = $("#button-load-dystopia"),
loadFantasy = $("#button-load-fantasy"),
loadScifi = $("#button-load-scifi"),
loadAll = $("#button-load-all");

When the page is loaded we want to fill the table with the data we've stored in the database (if any).
So we make an Ajax request in which we send a querystring action=all through the GET into our PHP file that will handle the retrieving of data from the database.
Then we append the returned data into our table's tbody. I've also defined here some variables to avoid having to get them through the $("#") markup every time we need them.
Also as we now add buttons that we want to have event's bind onto, we must call for a function to update the links.


So add this function into the end of the java script file.


function UpdateLinks()
{
$(".del").click(function(){
$("#bookid2").val(this.name);
$("#dialog-del").dialog('open');
return false;
});
$(".borrow").click(function(){
$("#bookid").val(this.name);
$("#dialog-borrow").dialog('open');
return false;
});
$(".return").click(function(){
$.get("load.php?action=return&id=" + this.name, function(data){
returnId = data;
});
$.get("load.php?action=all", function(data){
$('#books tbody').html(data);
UpdateLinks();
});
});
}

What it does is it adds event onto our newly created buttons.
The delete links opens the confirm delete dialog and the borrow link opens the borrow dialog.
Clicking on the return button runs another Ajax query to mark the book as returned in the database.
After altering the data in the database, we must reload the page contents and once again update the links.


Add the following code inside the first function. I.e. the one that gets fired on DOM load.


$('#dialog_link').click(function(){
$('#dialog').dialog('open');
return false;
});
$('#dialog_link, ul#menu li').hover(
function() { $(this).addClass('ui-state-hover'); },
function() { $(this).removeClass('ui-state-hover'); }
);
loadAll.click(function(){
$.get("load.php?action=all", function(data){
$('#books tbody').html(data);
UpdateLinks();
});
});
loadDystopias.click(function(){
$.get("load.php?action=dystopia", function(data){
$('#books tbody').html(data);
UpdateLinks();
});
});
loadFantasy.click(function(){
$.get("load.php?action=fantasy", function(data){
$('#books tbody').html(data);
UpdateLinks();
});
});
loadScifi.click(function(){
$.get("load.php?action=scifi", function(data){
$('#books tbody').html(data);
UpdateLinks();
});
});

Here we add functionality to the onclick event of the filter buttons and add the button for opening the add a book dialog.
Also I've added some visual candy with making the buttons to toggle their hover style on mouse enter and mouse leave events.


Ok, now onto making the dialogs work.


Here's the dialog for borrowing a book. Add all the rest of the java script inside the first function.


$("#dialog-borrow").dialog({
bgiframe: true,
autoOpen: false,
height: 140,
modal: true,
buttons: {
'Borrow book': function() {
$.get("load.php?action=borrow&id=" + bookid.val() + "&name=" + name.val(), function(data){
returnId = data;
});
$.get("load.php?action=all", function(data){
$('#books tbody').html(data);
UpdateLinks();
});
$(this).dialog('close');
},
Cancel: function() {
$(this).dialog('close');
}
}
});

Every one of these dialogs will follow this same pattern.
First we set the dialog options, then we add the buttons and add their actions.
The Borrow book button sends another Ajax call and like before after altering the data in the database we refresh the data on the page to match it.
When writing normal GET querystrings it is important to escape the ampersands with the &amp;, but in jQuery's Ajax calls we can't escape those special chars.


$("#dialog-del").dialog({
bgiframe: true,
resizable: false,
autoOpen: false,
height:140,
modal: true,
buttons: {
'Delete book': function() {
$.get("load.php?action=del&id=" + bookid2.val(), function(data){
returnId = data;
});
$.get("load.php?action=all", function(data){
$('#books tbody').html(data);
UpdateLinks();
});
$(this).dialog('close');
},
Cancel: function() {
$(this).dialog('close');
}
}
});

There's nothing special in the confirm delete dialog.
If the user confirms, we run yet another jQuery Ajax call and update the page contents.


$("#dialog").dialog({
bgiframe: true,
autoOpen: false,
height: 250,
modal: true,
buttons: {
'Add book': function() {
var bValid = true;
allFields.removeClass('ui-state-error');

bValid = bValid && checkLength(title,"title",3,80);
bValid = bValid && checkLength(author,"author",3,80);

if (bValid) {
$.get("load.php?action=add&title=" + title.val() + "&author=" + author.val() + "&genre=" + genre.val(), function(data){
returnId = data;
});
$.get("load.php?action=all", function(data){
$('#books tbody').html(data);
UpdateLinks();
});
$(this).dialog('close');
}
},
Cancel: function() {
$(this).dialog('close');
}
},
close: function() {
allFields.val('').removeClass('ui-state-error');
}
});

The dialog for adding a new book is a bit more complex as it includes a basic validation of form field values.
Well make a new function to check the length of the input values.
You can make this validation better, but here's the basics that should be in every input validation.


function updateTips(t) {
tips.text(t).effect("pulsate");
}

function checkLength(o,n,min,max) {
if ( o.val().length > max || o.val().length < min ) {
o.addClass('ui-state-error');
updateTips("Length of " + n + " must be between "+min+" and "+max+".");
return false;
} else {
return true;
}
}

If the field doesn't validate we add an error class to inform the user.
Also we update the contents of the validation tip paragraph and make it pulsate to better capture the users attention.
And that's all the java script we'll need for this project. Let's move onto the other end of the Ajax call.


Step 8 - The PHP functions


Create a new PHP file and name it load.php.
This is the file we used in the jQuery code to receive the Ajax calls and this is the file we assumed to receive some data from.


Let's make a basic switch controller to interpret the querystring commands.


<?PHP
switch ($_GET['action'])
{
case 'scifi':
ReturnAll("WHERE genre = 'Science Fiction'");
break;
case 'fantasy':
ReturnAll("WHERE genre = 'fantasy'");
break;
case 'dystopia':
ReturnAll("WHERE genre = 'dystopia'");
break;
case 'all':
ReturnAll();
break;
case 'add':
AddEntry($_GET['title'], $_GET['author'], $_GET['genre']);
break;
case 'borrow':
BorrowBook($_GET['id'], $_GET['name']);
break;
case 'return':
ReturnBook($_GET['id']);
break;
case 'del':
DeleteBook($_GET['id']);
break;
}
?>

The only function to touch the database will be the RunQuery function.
All the other functions will use this one with different arguments to access the data.


function RunQuery( $sql, $type )
{
$link = mysql_connect('localhost', 'username', 'password');
if (!$link) {
return false;
}
$db_selected = mysql_select_db('books', $link);
if (!$db_selected) {
mysql_close($link);
return false;
}
$result = mysql_query( $sql );
if (!$result) {
mysql_close($link);
return false;
}
if ( $type == "select")
{
$return = "";
while ($row = mysql_fetch_array($result, MYSQL_ASSOC)) {
$return .=
'<tr>
<td>' . $row['id'] . '</td>
<td>' . $row['title'] . '</td>
<td>' . $row['author'] . '</td>
<td>' . $row['genre'] . '</td>
<td>' . $row['status'] . '</td>';
if(strlen($row['status']) < 1)
$return .= '<td><a class="borrow" name="' . $row['id'] . '" href="#">Borrow book</a>';
else
$return .= '<td><a class="return" name="' . $row['id'] . '" href="#">Return book</a>';
$return .= ' / <a class="del" name="' . $row['id'] . '" href="#">Delete</a></td>
</tr>';
}
mysql_close($link);
return $return;
}
else if ( $type == "insert" )
{
$id = mysql_insert_id();
mysql_close($link);
return $id;
}

mysql_close($link);
return true;
}

The code should be pretty straight forward.
Open a database link and select the database we created earlier.
Then we run the given query and store it's results in the $result variable.


As we use this one function for all kinds of queries, we need to decide what to return based on the $type variable.
If the user requested a select query we return the query results formatted in a table row.
And if the request was to insert a new row we return the id of the new row.


It's a good practice to return Ajax data as XML, but since we are going to add the data into a table it's just the same to format it as html here as we can then style the table as a whole.


function ReturnAll($where = "")
{
$result = RunQuery("SELECT * FROM book $where ORDER BY id;", "select");
if( !$result )
{
echo '<tr><td colspan="5"><em>Error loading data or no data entered</em></td></tr>';
}
else
{
echo $result;
}
}

Here's the main select query. All the other selects ose this query with a changing $where variable.
If no entries were found we return (echo) a message indicating that nothing was found.


function AddEntry($title, $author, $genre)
{
echo RunQuery("INSERT INTO book VALUES(default, '$title', '$author', '$genre', '');", "insert");
}

function BorrowBook($id, $name)
{
echo RunQuery("UPDATE book SET status = '$name' WHERE id = $id", "update");
}

function ReturnBook($id)
{
echo RunQuery("UPDATE book SET status = '' WHERE id = $id", "update");
}

function DeleteBook($id)
{
echo RunQuery("DELETE FROM book WHERE id = $id;", "delete");
}

The rest of the functionality is pretty simple.
Just run a query in the database with the given arguments.


If we now run the application with the Firebug on we should see GET querystrings being sent to the load.php and data being returned from the server.


Conclusion


That's it for making a simple Ajax application and styling it with the jQueryUI library widgets.
Hope you enjoyed reading this tutorial and learnt something new.
Thanks for reading!

maanantai 29. kesäkuuta 2009

Making applications run on both SQL database and flatfile database

Today I will show you how to make your application run on both SQL databases and flatfile databases. This way we can make applications that take full use of the power of SQL databases but are also usable without them.

Introduction

In this tutorial we will be making a somewhat functional interface to a movie database.
Please note, however, that the main focus will be in the making of the database solution.
I won't waste your time with fancy CSS & JS tricks this time, but try to give you a deep view into Object Oriented Programming (OOP), some design patterns and the MVC -model (Model, View, Controller).

After this tutorial you should be able to use textfiles as primitive databases and design your applications so that changing the database won't affect it's functionality.
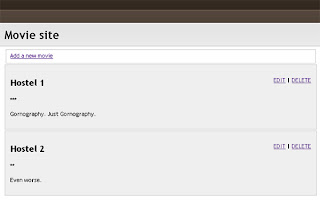
Here's a picture of what we will be creating.


Step 1 - Understanding MVC & Design Patterns

The idea behind MVC - and the reason why you should use it - is to separate the different parts of an application.


  • The Model
    The Model should be the only interface through which your application accesses the database or object properties.

  • The View
    The View should be the only place where you define how things are to be draw on the screen.

  • The Controller
    And the Controller is the brains behind it all.
    The Controller gets input from the user, makes decisions on how to act, requests the required data from the Model and tells the View to display it to the user, without having any idea where the Model is going to take the data from or how the View is going to display it.

In a basic sense a modern website is sort of MVC.
The HTML or XML file holds the information, the CSS takes care of styling and the JS event kind of run it all.
We, however, will be using the MVC all inside the PHP application.

I've divided the PHP application into a Framework class, that will act as the controller for this project, a View class that will load up predefined templates and inject the requested content in them and a Model class that will decide whether to use SQL database or a flatfile database and depending on that will spawn the right kind of Model subclass.

The Model will implement a design pattern called the Factory pattern.
What that means is that it will create us the kind of model class that we need.
The Framework will be implementing an another design pattern called the Singleton pattern.
In short the singleton is a class that can be instantiated exactly one time.
The class can not be created from outside itself, instead the very class will be holding the information whether or not it "exists" and creates itself when needed.
But more on that later.


Step 2 - Prepare the SQL database

This will be a very simple movie database application, so well manage with just one table. Create it as follows.


CREATE DATABASE `movies` ;

CREATE TABLE `movies`.`movie` (
`id` INT NOT NULL AUTO_INCREMENT PRIMARY KEY ,
`title` VARCHAR( 100 ) NOT NULL ,
`rating` INT NOT NULL ,
`freetext` VARCHAR( 250 ) NOT NULL
) ENGINE = MYISAM ;

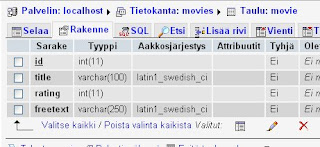
This will give us a database table something like in the following picture.


For the flatfile database we need no preparing as it will be created the first time it's used.

Step 3 - Begin Object Oriented PHP

Create a new php file and name it index.php. Or whatever you like, we won't be referencing that name anywhere in the code. But mine is index.php.
That file is going to be very small - only a fhew lines. First of all we need to require the Framework (that we have not yet made).

<?php
require_once 'Framework.php';

The next part is where the design patterns come to play.


$app = Framework::singleton();
$app->main();

We ask the framework to give us an instance of itself.
If there's no instances yet, it will be created by the class, but if the class is already instantiated, it will return us the existing instance.
The constructor of the Framework prepares the other classes and the next thing to do is to just call the Framework's main method.

exit();
?>

Then we can stop the execution of the code and our first file is complete. Just four lines of code.

Unfortunately the other files won't be as easy to write, but just take your time reading and take breaks as needed and I trust you will do just fine.

Step 4 - The Framework

Like said, this is where the brains of the application are. We'll start by adding the rest of our soon to be written files to this one.

<?php
require_once 'settings.php';
require_once 'view.php';
require_once 'model.php';

In the beginnig of the class we'll define some variables.
The instance is going to hold this class.
That may be a little tricky to understand at first, but it will get clearer as me move along.

class Framework
{
private static $instance;
private static $view;
private static $model;

The __constructor is a method that gets called automatically by PHP when an object gets instantiated.
Notice that it is set to private, so it can't be called from outside this object.
We then set the view variable to point at our View class and set the model variable to point at what ever our Model Factory returns us.

 private function __construct()
{
self::$view = new View();
self::$model = Model::GetModel();

Ok, now that we have a pointer to a model of some sort, let's make sure it's working.
We don't know what the connect method is doing.
It might be trying to open a mySql database connection or creating a file handle for reading text files, but we know that it's supposed to return 1 if everything went OK.

  if ( self::$model->connect() != 1 )
{
echo "Fatal error trying to connect to database.";
exit(0);
}
}

Then the singleton method.
First we check if we have already done this.
If we already have an instace of the class we can just return it, but if it is not yet set we declare it as a new instance of our class.
The __CLASS__ returns whatever class it's in, I might have just as well written self::$instance = new Framework(); It's just the same.

 public static function singleton()
{
if( !isset( self::$instance ) )
{
$obj = __CLASS__;
self::$instance = new $obj;
}

return self::$instance;
}

This next part is not at all necessary, but it is important to add if we want to make sure our singleton remains singe.
If the user tries to clone the object, and error will get triggered.
Again the __clone method is something PHP calls automatically when needed.

 public function __clone()
{
trigger_error( 'Cloning the framework is not permitted', E_USER_ERROR );
}

Let's leave our main method a bit empty for now.
All we do is tell the View to present to the user what the Model has stored.
We'll come back to this later on to add the functionalities.

 public function main()
{
self::$view->showFrontpage( self::$model->GetAllMovies() );
}
}
?>

Step 5 - Setting the settings

Create a new PHP file and call it settings.php.
Here we'll be holding stuff like the database credentials and instructions for the formatting of the flatfile.
The DBTYPE variable will hold the type of database we want to use.
For this example we'll make both mysql and flatfile dbtypes, but if we would happen to need an XML database, all we'd need to do is write it's Model and change the DBTYPE to xmlfile.

<?php
class Settings
{
static $DBTYPE = "mysql";

static $dbhost = "localhost";
static $dbuname = "username";
static $dbpass = "password";
static $dbase = "movies";

static $FILENAME = "db.txt";
static $DELIMITER = '|';
static $ENDROW = '$';
}
?>

I've also specified here the name of the text file that will be used if the DBTYPE is set to flatfile.
The DELIMITER and ENDROW chars are also defined here, so that if you would happen to have a movie with a name like I am Le|gen$d, you can change these to something else.
What they do is tell the model where to snip out cells and rows from a stream of characters.

Step 6 - The Model Factory

Again let's make a new PHP file and call this one the model.php.
Here's a bit longer chunk of code, but it should be pretty clear.


<?php
require_once 'Model_SQL.php';
require_once 'Model_FILE.php';

class Model
{
private static $model;

public static function GetModel()
{
switch (Settings::$DBTYPE)
{
case "mysql":
self::$model = new Model_SQL();
break;
case "flatfile":
default:
self::$model = new Model_FILE();
break;
}

return self::$model;
}
}
?>

We include the files needed and depending on what's written in the settings.php's DBTYPE variable we instanciate the appropriate class and return a pointer to it back to the Framework.

Step 7 - The SQL Model

Quess what? Let's add a new PHP file to our project.
Call this one the Model_SQL.php.
We wont need anything special in the constructor of this class as we have already called for the connect function.
Declare the private static $conn variable to hold the handle of the database connection for future use.

<?php
class Model_SQL
{
private static $conn;

public function __construct()
{
}

public function connect()
{

We'll attempt the mysql_connect and return something other than 1 if the method fails.
Otherwise we'll then select the database to use and inform the Framework that everything wen't fine.

  self::$conn = mysql_connect( Settings::$dbhost, Settings::$dbuname, Settings::$dbpass );
if ( !self::$conn )
{
return 0;
}
mysql_select_db( Settings::$dbase, self::$conn );
return 1;
}

There's not much to say about the next two methods.
Mysql_close and mysql_query do exactly what one might think.
We'll be using the Query method whenever we want something from the database.
I've made it private to ensure that only this object can call it.

 public function disconnet()
{
mysql_close( self::$conn );
}

private function Query( $sql )
{
return mysql_query( $sql );
}

Then a simple GetAll query.
As we read only one row at a time, we need to stack the rows into an array to return the whole thing as one.
The row's are also arrays and with the flag MYSQL_ASSOC we get the names of the database table columns as the keys of our array.

 public function GetAllMovies()
{
$rows = Array();
$result = self::Query( "SELECT * FROM movie ORDER BY title;" );

while ($row = mysql_fetch_array($result, MYSQL_ASSOC))
{
array_push($rows, $row);
}

return $rows;
}
}?>

Let's leave it at that for now as we have a lot more ground to cover.

Step 8 - The Text Model

The text model will (and must) have all the same methods as the SQL model.
In other programming lanquages this could be ensured by making an interface class but now I'm just trusting myself to remember to give both model the same methods.

Make a new PHP file and name it Model_FILE.php.
The beginning of the file is almost identical to that of the other model file, but here we have also an array where we can store the data we read from the file.

<?php
class Model_FILE
{
private static $conn;
private static $movies = Array();

public function __construct()
{
}

public function connect()
{

In the connect method we'll actually be reading the entire database into memory.
In small files this is no problem, but you can't really do a Facebook on flatfile db.
We'll attempt to open the file, place the pointer at the beginnig ('a+') and start reading lines.

Trim each line to get rid of any special characters like newlines etc. and split the line into variables at the delimiter.
Stack the lines in the array and remember to close the file handle.

  self::$conn = fopen(Settings::$FILENAME, 'a+') or die();
if ( filesize( Settings::$FILENAME ) > 0 )
{
while ( !feof(self::$conn) )
{
$line = fgets(self::$conn, 1024);
$line = trim($line);
list ($id, $title, $rating, $freetext) = split (Settings::$DELIMITER, $line);
$tmp = Array("id" => $id, "title" => $title, "rating" => $rating, "freetext" => $freetext);
array_push(self::$movies, $tmp);
self::$conn++;
}
fclose(self::$conn);
}
return 1;
}

The GetAll methos is pretty simple as we already have the data in an array.

 public function GetAllMovies()
{
return self::$movies;
}
}?>

Step 9 - The View

Now we get the data we need but we still need some way to present it to the user. So create a new PHP file and name it view.php.
This tutorial's view class is nearly empty, but in some other projects there's going to be stuff going on here as well.

The view opens up predefined template files according to the Framework's will.

<?php
class View
{
private static $TEMPLATESRC = "templates/";

public function showFrontpage( $movies )
{
include self::$TEMPLATESRC . "template.php";
}
}
?>

Step 10 - The Templates

Create a new folder called templates and in that folder a new file called template.php. This will be our default template.

<!DOCTYPE html PUBLIC "-//W3C//DTD XHTML 1.0 Strict//EN" "http://www.w3.org/TR/xhtml1/DTD/xhtml1-strict.dtd">
<html xmlns="http://www.w3.org/1999/xhtml">
<head>
<meta http-equiv="Content-Type" content="text/html; charset=utf-8" />
<title>Movie Site</title>
<link rel="stylesheet" href="style.css" type="text/css" media="screen" />
</head>
<body>
<div id="container">
<h1>Movie site</h1>
<fieldset>
<label><a href="" onclick="document.getElementById('form').style.display = 'block'; return false;">Add a new movie</a></label>
<div id="form">
<form method="post" action="?add=1">
<p><label for="title">Title</label><br />
<input type="text" name="title" /></p>
<p><label for="rating">Rating</label><br />
<select name="rating">
<option value="1">1 Star</option>
<option value="2">2 Stars</option>
<option value="3">3 Stars</option>
<option value="4">4 Stars</option>
<option value="5">5 Stars</option>
</select></p>
<p><label for="freetext">Review</label><br />
<textarea name="freetext" rows="4" cols="60"></textarea></p>
<input type="submit" name="submit" value="Add movie" />
</form>
</div>
</fieldset>

<!-- INSERT PHP HERE -->

</div>
</body>
</html>

It's just a simple form to add more movies, but I've styled it to hidden by default.
On clicking the Add new movie link the form is revealed.
The link has javascript return false to prevent it from taking the user into the href="" page.
An other way of doing this would be to set the href="javascript: void('null');".

<?php
if( count( $movies ) == 0 )
{
echo "<p><em>No movies</em></p>";
}
else
{
foreach ( $movies AS $i => $key )
{
echo "
<div class=\"movie\">
<p class=\"controls\"><a href=\"?edit=" . $movies[$i]['id'] . "\">EDIT</a> |
<a href=\"?\" onclick=\"if(confirm('Really delete?')){document.location = '?del=" . $movies[$i]['id'] . "'; return false;}\">DELETE</a></p>
<h2>" . $movies[$i]['title'] . "</h2>
<p>";

for ( $j = 0; $j < $movies[$i]['rating']; $j++ ) echo "*";

echo "</p>
<p>" . $movies[$i]['freetext'] . "</p>
</div>
";
}
}
?>

In the PHP part we just loop through the array and echo out the contents.

Step 11 - The CSS

Just a quick and dirty piece of css.

BODY
{
background-image: url('images/bg.jpg');
background-repeat: repeat-x;
background-position: top;
font-family: 'Trebuchet MS';
font-size: 11px;
}
div#container
{
width: 600px;
margin: 90px auto;
}
h1
{
font-family: 'Trebuchet MS';
}
div.movie
{
border: 1px solid #ccc;
background-color: #efefef;
padding: 10px;
margin-bottom: 2px;
}
p.controls
{
float: right;
}
div#form
{
display: none;
}
fieldset
{
margin-bottom: 2px;
border: 1px solid #ccc;
}

Now we have a simple movie database that can request data from two different sources.
Not all that impressive, but wait, there's more!

Step 12 - Adding Functionality (PHP)

Open up the Frameword.php and locate the main method. Add the following lines to the beginnig of the method.

  if(isset($_GET['add']))
{
$newmovie = Array("title" => $_POST['title'], "rating" => $_POST['rating'], "freetext" => $_POST['freetext']);
self::$model->AddMovie( $newmovie );
}
else if (isset($_GET['edit']))
{
$row = self::$model->GetMovie( $_GET['edit'] );
self::$view->showEditpage( $row );
return;
}
else if (isset($_GET['done_editing']))
{
$newmovie = Array("id" => $_GET['done_editing'], "title" => $_POST['title'], "rating" => $_POST['rating'], "freetext" => $_POST['freetext']);
self::$model->UpdateMovie( $_GET['done_editing'], $newmovie );
}
else if (isset($_GET['del']))
{
self::$model->DeleteMovie( $_GET['del'] );
}

We take the arguments passed by the user through $_GET or $_POST and call the Model to store, edit or remove content.
Also if the user has requested an entry for editing, we call the View to show a different template and stop the rest of the code from executing.

You can now close the Framework.php as we'll move onto the other parts. Open the view.php and add the new method there.

 public function showEditPage( $movie )
{
include self::$TEMPLATESRC . "edit_template.php";
}

If we're editing content we want to see the editing page instead of the frontpage. Create a new PHP file in the templates folder, name it edit_template.php and paste the following in it.

<!DOCTYPE html PUBLIC "-//W3C//DTD XHTML 1.0 Strict//EN" "http://www.w3.org/TR/xhtml1/DTD/xhtml1-strict.dtd">
<html xmlns="http://www.w3.org/1999/xhtml">
<head>
<meta http-equiv="Content-Type" content="text/html; charset=utf-8" />
<title>Movie Site</title>
<link rel="stylesheet" href="style.css" type="text/css" media="screen" />
</head>
<body>
<div id="container">
<h1>Movie site</h1>
<fieldset>
<label>Edit movie</label>
<form method="post" action="?done_editing=1">
<p><label for="title">Title</label><br />
<input type="text" name="title" value="<?php echo $movie['title']; ?>" /></p>
<p><label for="rating">Rating</label><br />
<select name="rating">
<option value="1"<?php if($movie['rating'] == 1) echo " selected" ;?>>1 Star</option>
<option value="2"<?php if($movie['rating'] == 2) echo " selected" ;?>>2 Stars</option>
<option value="3"<?php if($movie['rating'] == 3) echo " selected" ;?>>3 Stars</option>
<option value="4"<?php if($movie['rating'] == 4) echo " selected" ;?>>4 Stars</option>
<option value="5"<?php if($movie['rating'] == 5) echo " selected" ;?>>5 Stars</option>
</select></p>
<p><label for="freetext">Review</label><br />
<textarea name="freetext" rows="4" cols="60"><?php echo $movie['freetext']; ?></textarea></p>
<input type="submit" name="submit" value="Done editing" />
</div>
</fieldset>


</div>
</body>
</html>

It's just a form with the values echoed by PHP.
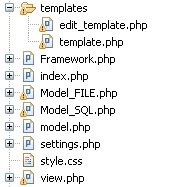
You should now have the following files and folders.


Step 13 - Adding Functionality (SQL)

Here's the rest of the Model_SQL file. Just running some queries and returning what the database server returns.

 public function GetMovie( $id )
{
$result = self::Query( "SELECT * FROM movie WHERE id = $id;" );
return mysql_fetch_array($result, MYSQL_ASSOC);
}

public function AddMovie( $newmovie )
{
$result = self::Query( "INSERT INTO movie VALUES (default, '" . $newmovie['title'] . "', '" . $newmovie['rating'] . "', '" . $newmovie['freetext'] . "');" );
}

public function UpdateMovie( $id, $newmovie )
{
$result = self::Query( "UPDATE movie SET title = '" . $newmovie['title'] . "', rating = '" . $newmovie['rating'] . "', freetext = '" . $newmovie['freetext'] . "' WHERE id = " . $id . ";" );
}

public function DeleteMovie( $id )
{
$result = self::Query( "DELETE FROM movie WHERE id = $id;" );
}

Step 14 - Adding Functionality (flatfile)

Here comes the final tricky part of this tutorial.
SQL databases are sophisticated tools with great functionality build in them.
Textfiles are not. Everythig must be done by PHP and most thing are just too comlicated to be done efficiently enough.
But for a small application like this even a text file is plenty of database.

 public function SaveToFile()
{
$lines = Array();
$counter = 1;
foreach (self::$movies AS $i => $key)
{
$tmp = implode(Settings::$DELIMITER, self::$movies[$i]);
$tmp = substr($tmp, strpos($tmp, Settings::$DELIMITER) + 1);
$tmp = $counter . Settings::$DELIMITER . $tmp;
array_push($lines, $tmp);
$counter++;
}
$string = implode("\n", $lines);

$fh = fopen(Settings::$FILENAME, 'w');
fwrite($fh, $string);
fclose($fh);
}

Here we have the heart and soul of our class.
It goes throught the array, implodes each row into a string palcing the delimeter between values, strips the id from each row and replaces it with a serialized number.
This is becose while SQL gives us an auto_increment primary key, the textfile has no way of identifying the lines for one another.
Then we implode each line into a string and save it in the beginnig of the file truncating the previouse content.
Each time we change something in the movies array we must call this method to ensure the changes are saved.

 public function AddMovie( $newmovie )
{
array_unshift($newmovie, 0);
array_push(self::$movies, $newmovie);
$this->SaveToFile();
}

Ok, this one is simple.
We get the array holding the user submitted information and simply push it to the end of our movies array and save it all to the file.
Since we dont have the primary key, I'm unshifting a number to the newmovie array, so the columns would match.

 public function DeleteMovie( $id )
{
for ($i = 0; $i <>SaveToFile();
}

Again wery simple. Go through all the movies and unset the one with the given id. Then save.

 public function UpdateMovie( $id, $newmovie )
{
for ($i = 0; $i <>SaveToFile();
}

The updating goes just like the deleting except that instead of unset, we simply overwrite. And don't forget to save.

Step 15 - Take a deep breath

That's it. It has been a long road and the subject has been tough, but we made it!
Instead of showing you neat tricks or beautiful desings I've written about programming, code design and patterns.
I hope you have found this tutorial helpful and maybe next time I'll write something a little less dull ;)
Thanks for reading!